Your MyMatrixMaxx Dashboard allows you to customize the Widgets to compliment the tasks you need to do in MatrixMaxx. Here are some tips on how to edit the Widgets to get the most out of your Dashboard.
When you first log in, you will have a selection of commonly used Widgets. With the exception of the ‘Announcements and Patch Notes’ Widget, these can all be moved, edited or removed.
Editing Widgets
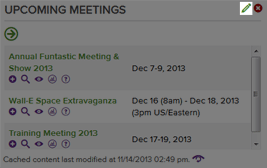
 Many of the Widgets have editable options. To see if a widget has editable options, mouse your mouse over the Widget. If a green pencil icon appears in the upper right corner of the Widget, then it has editable options. You can see the example to the right. When I mouse-over the Upcoming Meetings Widget, I see the green pencil icon. In the case of the Upcoming Meetings Widget, I can edit how many future meetings I want to see.
Adding New Widgets
While your default screen will only have a handful of Widgets, there are many to choose from. To add a new Widget, click the plus sign icon in the upper right corner of the body of the page, just below the Bookmark function. You will get a list of Widget categories. Click the category to see what Widgets are available in that category. Then click the individual Widget that you would like to add. This new Widget will be placed in the first open slot on your Dashboard.
We encourage you to browse through the available Widget and find which ones will be most useful to you.
Reordering Your Widgets
If you would like to change the order of your Widgets, Click the large green pencil icon in the upper right of the page. Each of the Widget slots will be outlined with a dashed purple line. Simply drag a Widget to the location you would like it and it will switch places with the widget or empty slot that was there before. The only widget that you cannot reorder is the ‘Announcements and Patch Notes’ Widget.
Deleting Widgets
If there is a Widget which you would no longer want on your dashboard, move your mouse over it and a red X icon will appear in the upper right corner of the Widget. Click the X icon and confirm that you would like to delete the Widget, and it will be removed from your dashboard. You can always add it back later.
Resizing Widgets
You may also re-size individual Widgets to take up more than one ‘slot’ on the grid. To do this, click the large edit pencil like you would if you were reordering the Widgets. in the lower right corner of each Widget will be a place you can click and drag with your mouse to have the Widget be larger. Once you are done, click the check mark in the upper right of the page.
